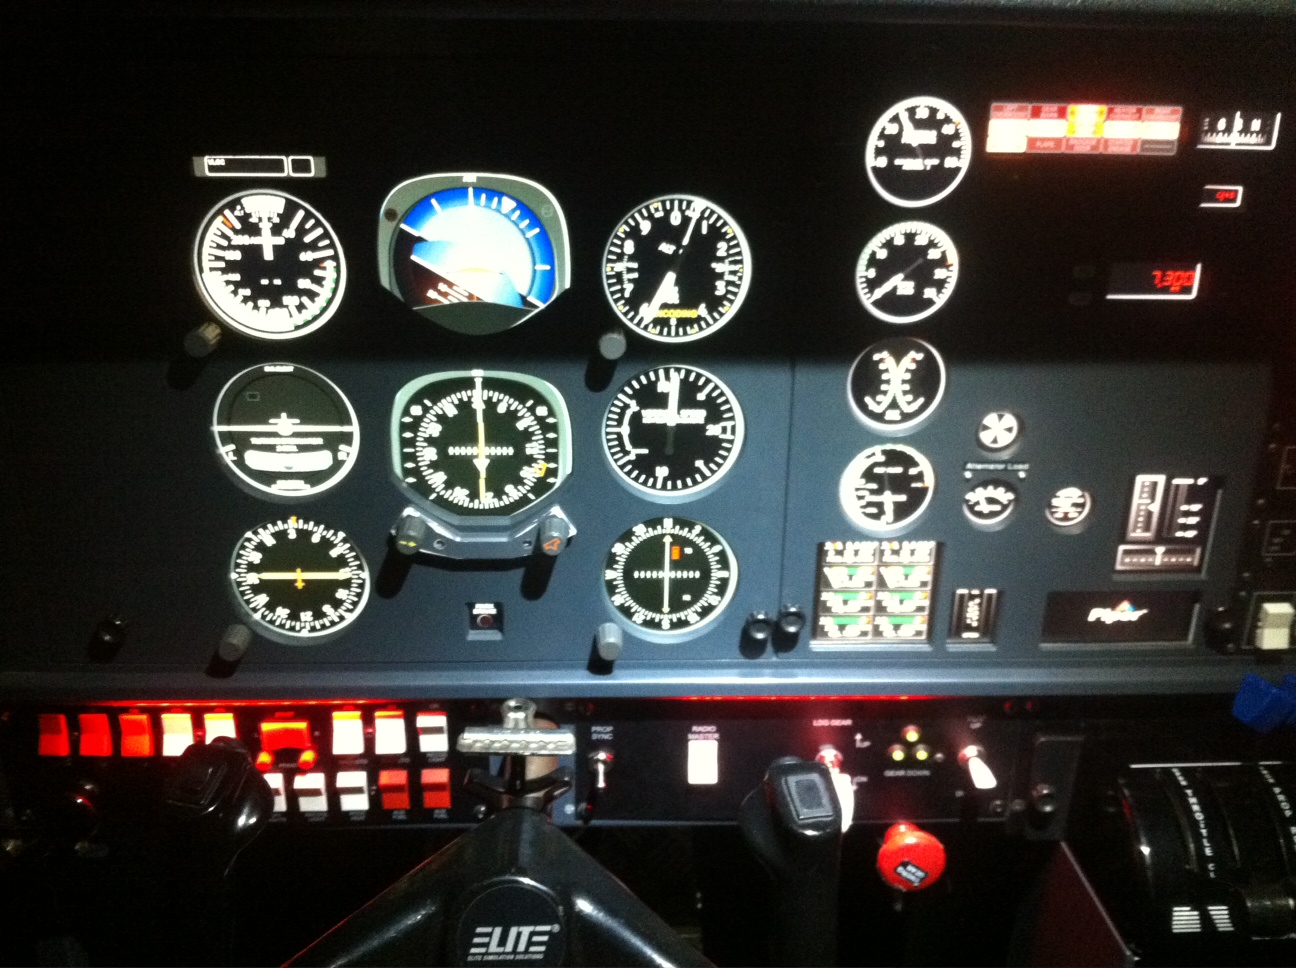
Even if you think you are just a VFR pilot, and the thought of even attempting the instrument rating exam, sends you running as far as possible from any instrument flying, this is completely understandable. However, having some basic knowledge of instruments can really help you out when it comes to navigation, and even make your flying fun! Importantly, I am not suggesting that you should go out and fly in clouds just because I am going to show you how to set up an HSI (Horizontal Situation Indicator), but it could make your navigation to a new airfield a bit more exciting than following the boring old GPS. I like this instrument because it involves a bit of brain gym, and that is always a good thing, for the prevention of pre-mature expiration of the grey matter.
The first thing to understand, is that the HSI is a radio navigation instrument, that uses VHF frequency and is in actual fact a combination of two instruments, namely the DI (Directional Indicator) and the VOR (VHF Omni Range) instrument. The main purpose of the HSI is to show you where you are, in terms of horizontal heading based on a rotating compass rose, and where you are in relation to a specific VOR station, and how to get to it (particularly useful if your GPS fails, but according to the map there is a VOR beacon at the aerodrome you are trying to get to). The following steps will help you get to grips with working the HSI, but I do recommend that you give it some practice, firstly setting it up (an excellent App that will have you amused for hours VOR Tracker ), and on a simulator just so you get really good at it.
STEP 1 – TIT
Now I know that the acronym ‘TIT’ would probably get some of you excited, but really, it is the most boring part. It simply stands for ‘TUNE, IDENTIFY, TEST‘. So the first thing you do, is look at your map, find the VOR you want, making sure that you use the symbol guide (don’t use the dotted NDBs), it will usually consist of a 3 letter code, in this case, WIV 113.3 which is the VOR for Witbank. If the frequency is not marked, then you will find it in your aerodrome information publication. Select the ‘NAV‘ option/button on your radio, and tune in the frequency, making sure it is set as the primary frequency. Next, press ‘IDENT‘ and you should hear a Morse code signal, compare this to the dots and dashes indicating ‘WIV’ to make sure that you have tuned in the correct frequency.
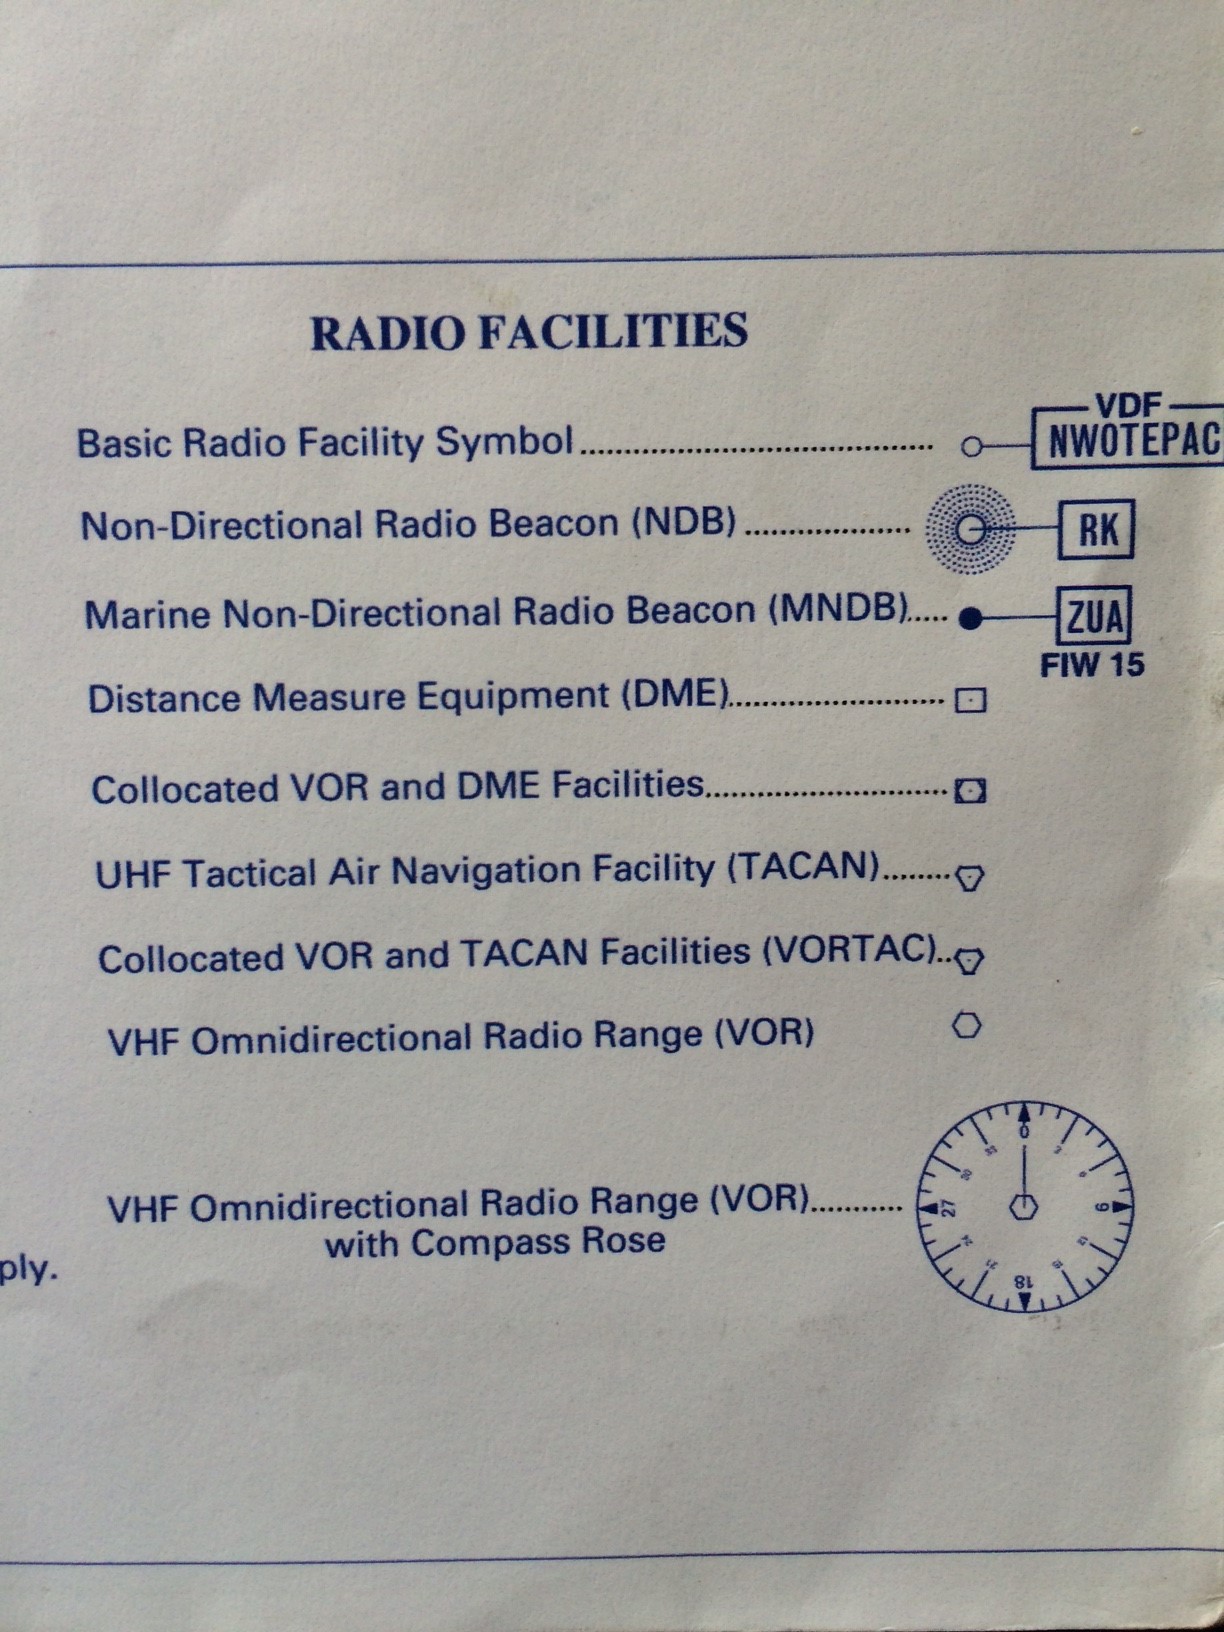
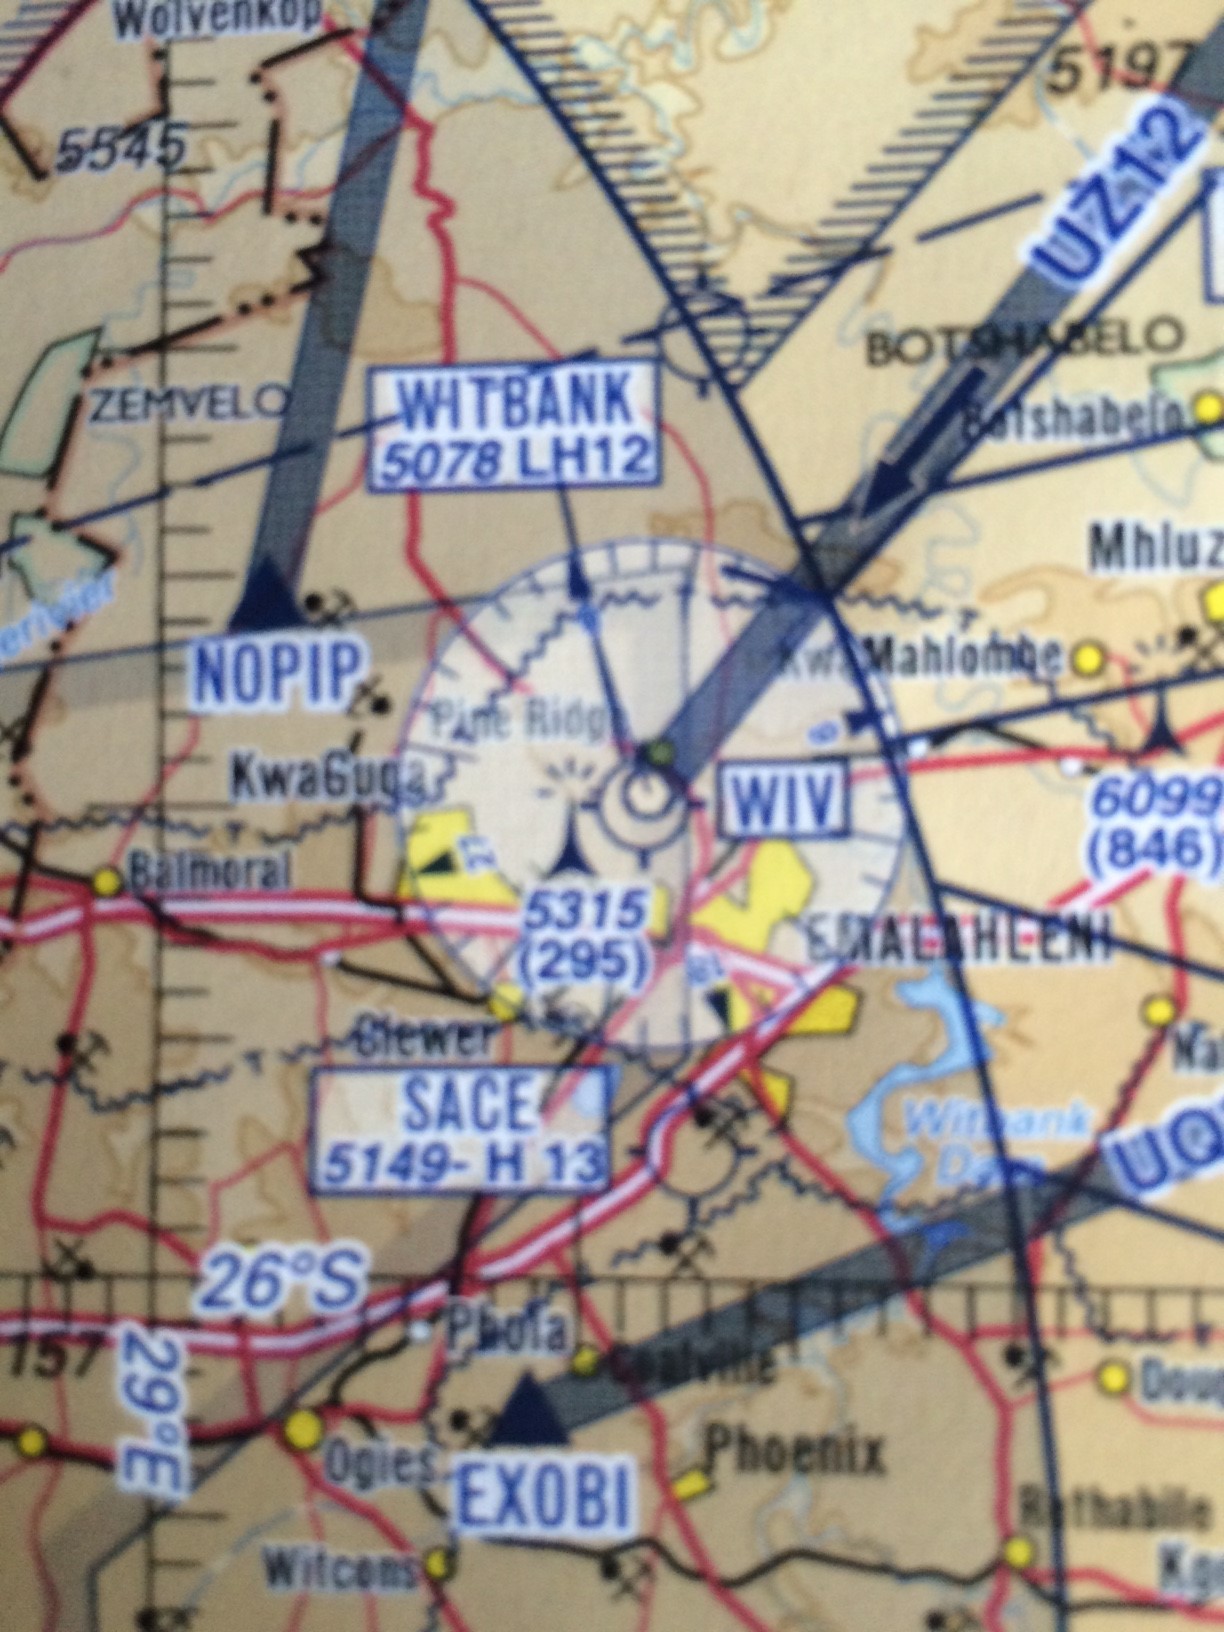
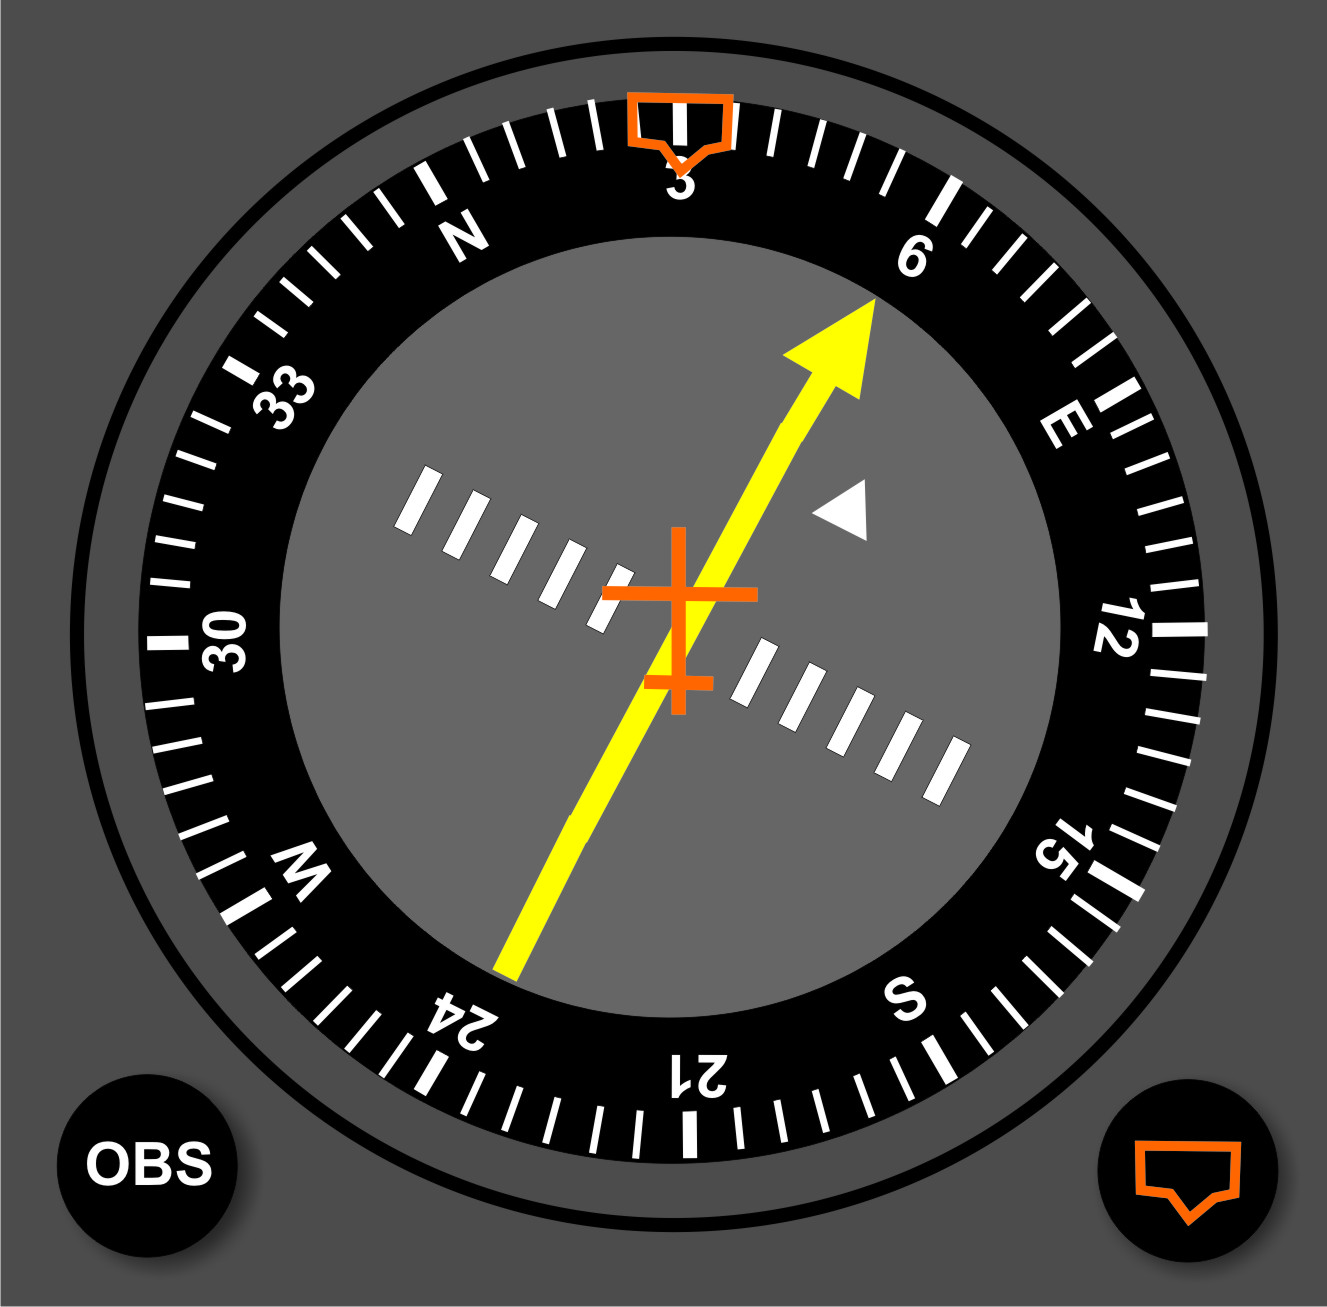
Then, turn off the bleating IDENT, and proceed to test the instrument, by centralising the CDI (Course Direction Indicator), which is the yellow needle. This means that you want the middle line to join up with the point and the tail to form a perfect arrow. Your heading is indicated by the orange heading bug (controlled by the right HDG knob), so stay on that heading for now. Now turn the OBS knob (the left one) to the left 10 degrees, and then to the right 10 degrees, this will indicate that it is functional.
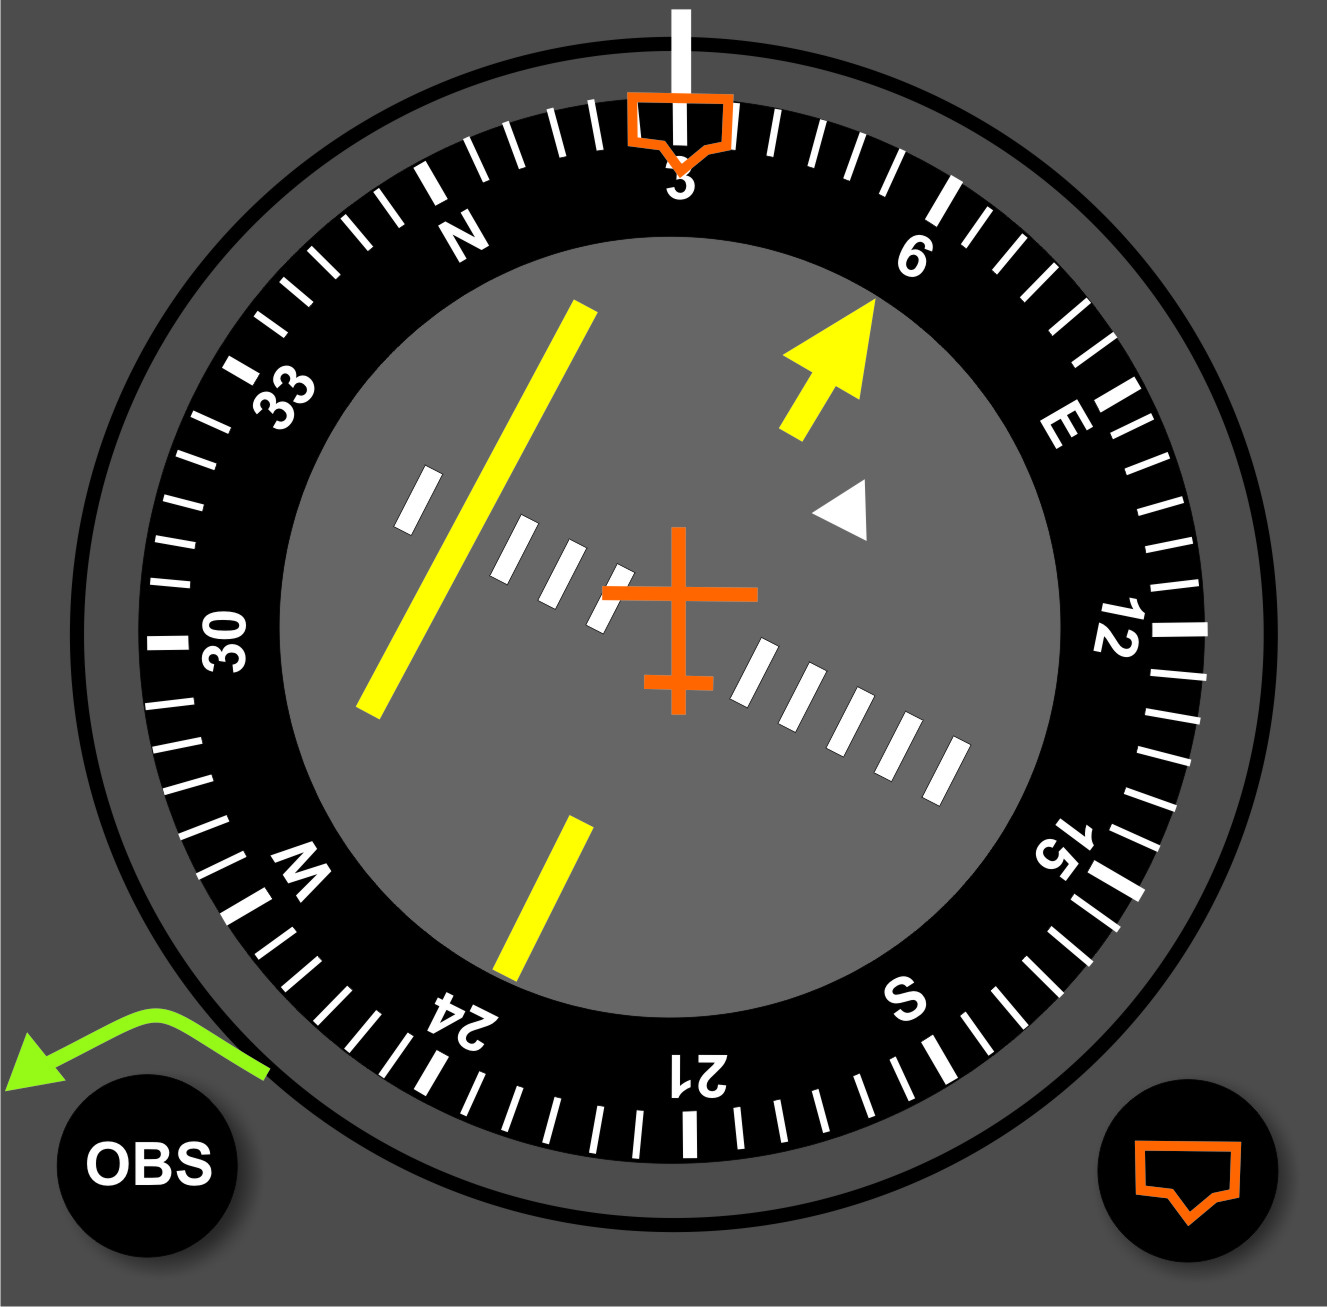
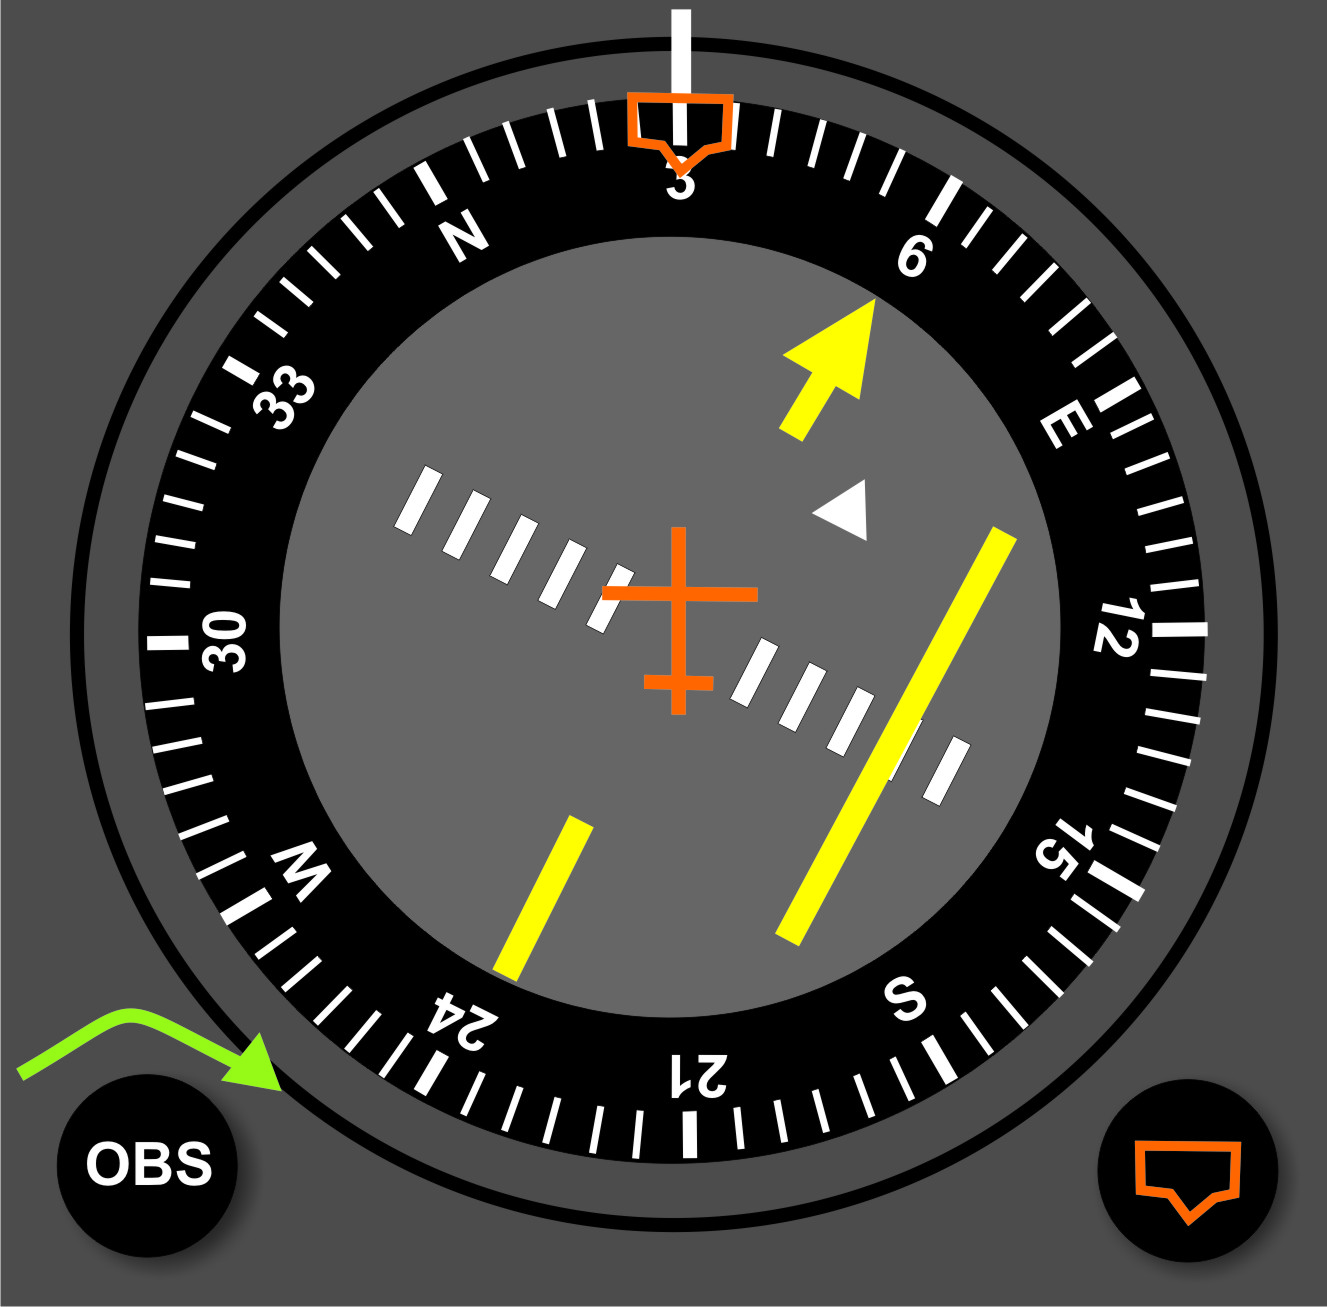
STEP 2 – WHERE ARE WE?
You firstly need to imagine a bicycle wheel, with the VOR as the central hub, and then 360 spokes (degrees) emanating from it. Each ‘spoke’ is called a radial, and it radiates outwards from the centre. This means that if we are overhead the VOR, and we fly away from it, with the CDI aligned on one of those radials, in no wind, our heading will be at the same point as the yellow pointer of the CDI once aligned.
Regardless, if we want to know where we are, we need to centralise the CDI by turning the OBS knob. The important thing to note here, is that, if the white ‘FROM‘ arrow/flag is showing (it will point in the opposite direction to the yellow pointer), then we are flying away from the VOR. If we are going towards the station, then the CDI needle will centralise with the ‘TO’ arrow pointing in exactly the same direction as the yellow pointer.
However, when we are going TO the station, we are not flying on the number of the radial (which goes away from the beacon), but rather 180 degrees opposite to the number of the radial i.e. the reciprocal. So the pointer will be on the reciprocal (and heading TO the station once aligned), and the tail of the needle tells us what radial we are on. Radials do not change direction, they always stay FROM, so when the CDI is aligned with the TO flag showing, the TAIL of the needle tells us what radial we are on, and the pointer tells us which heading we are flying to maintain that radial and get TO the station.
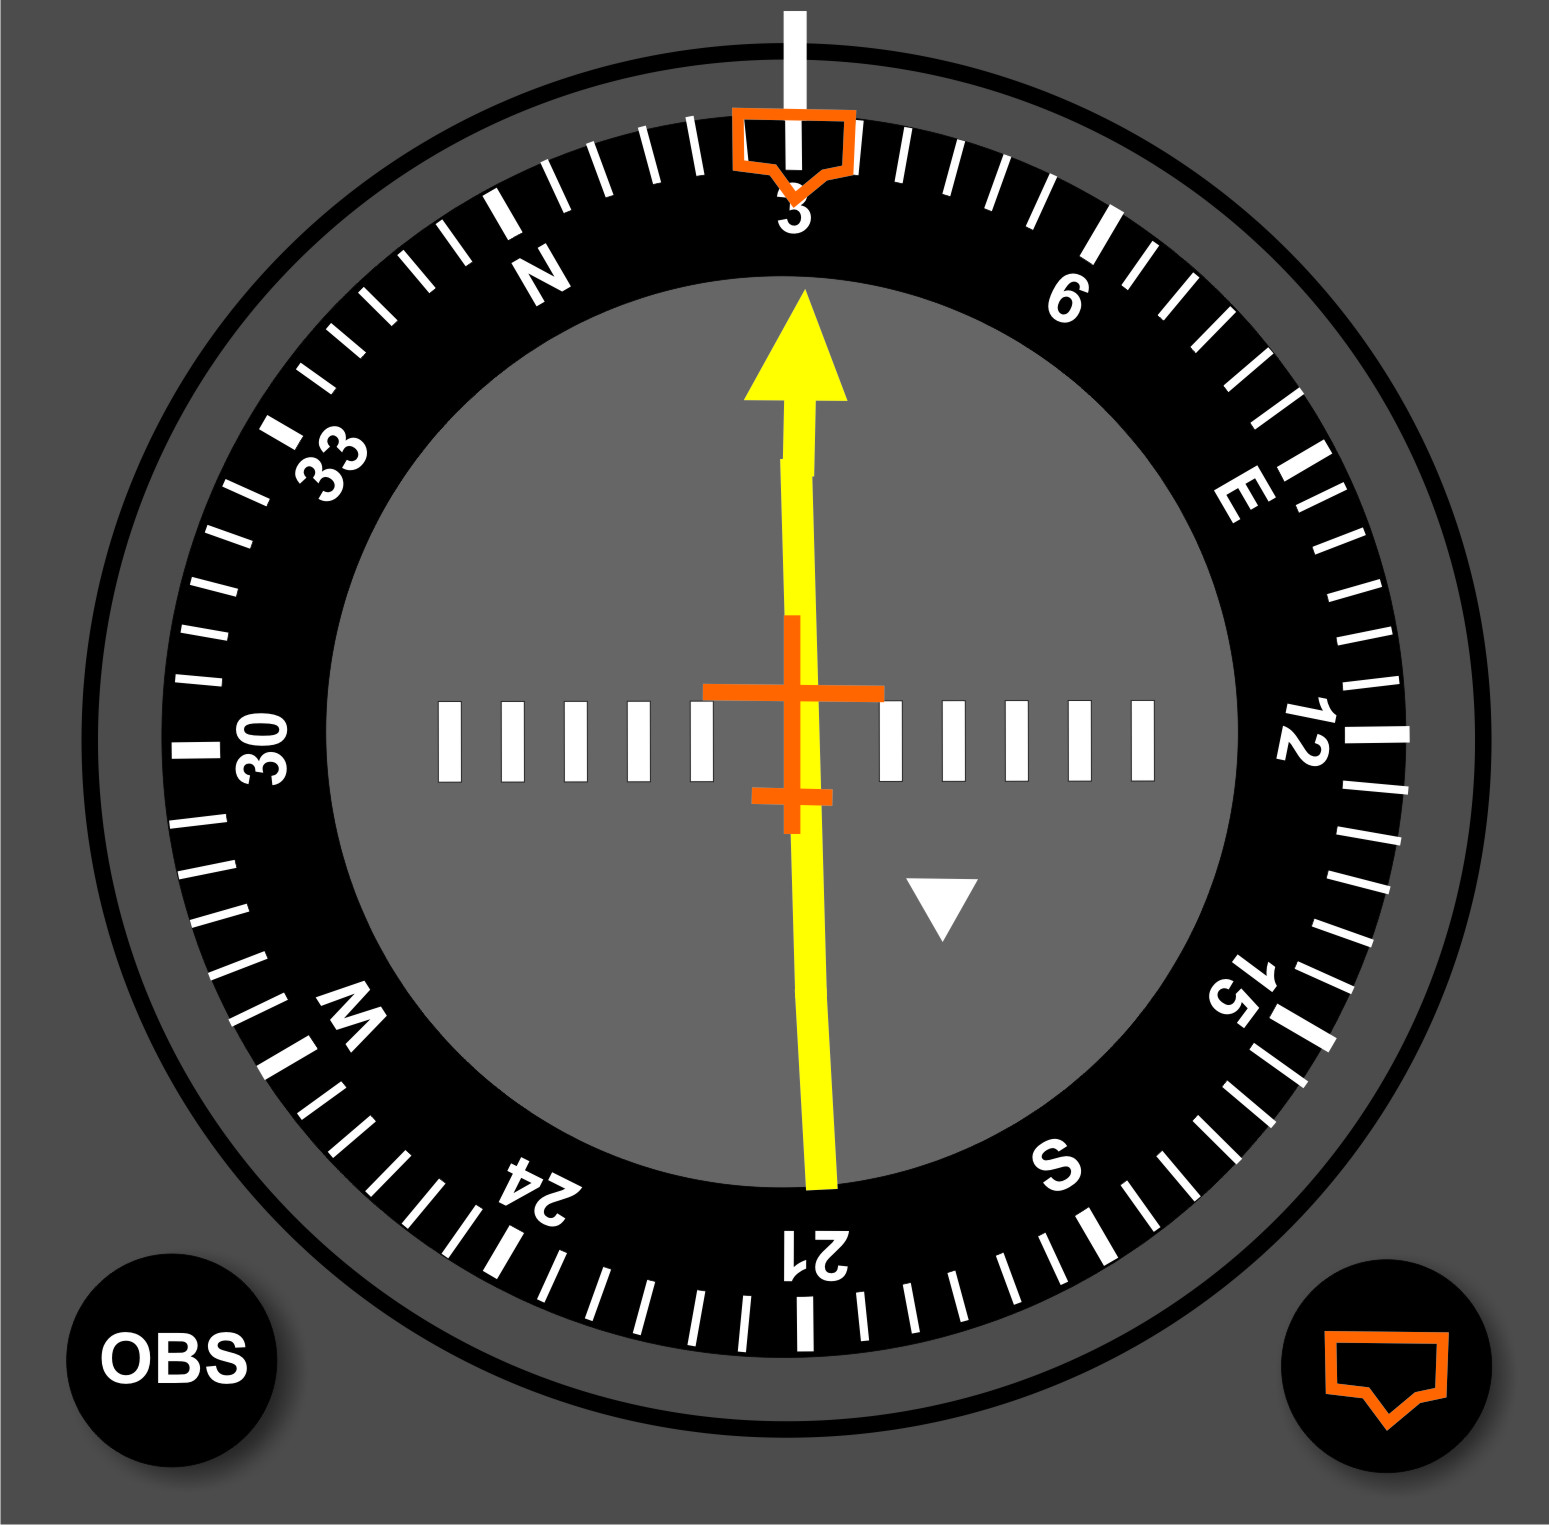
FROM – In this case we have just passed overhead the station and now flying the 030 radial FROM the station. The heading bug is aligned with the CDI once we have intercepted the radial and there is no wind.
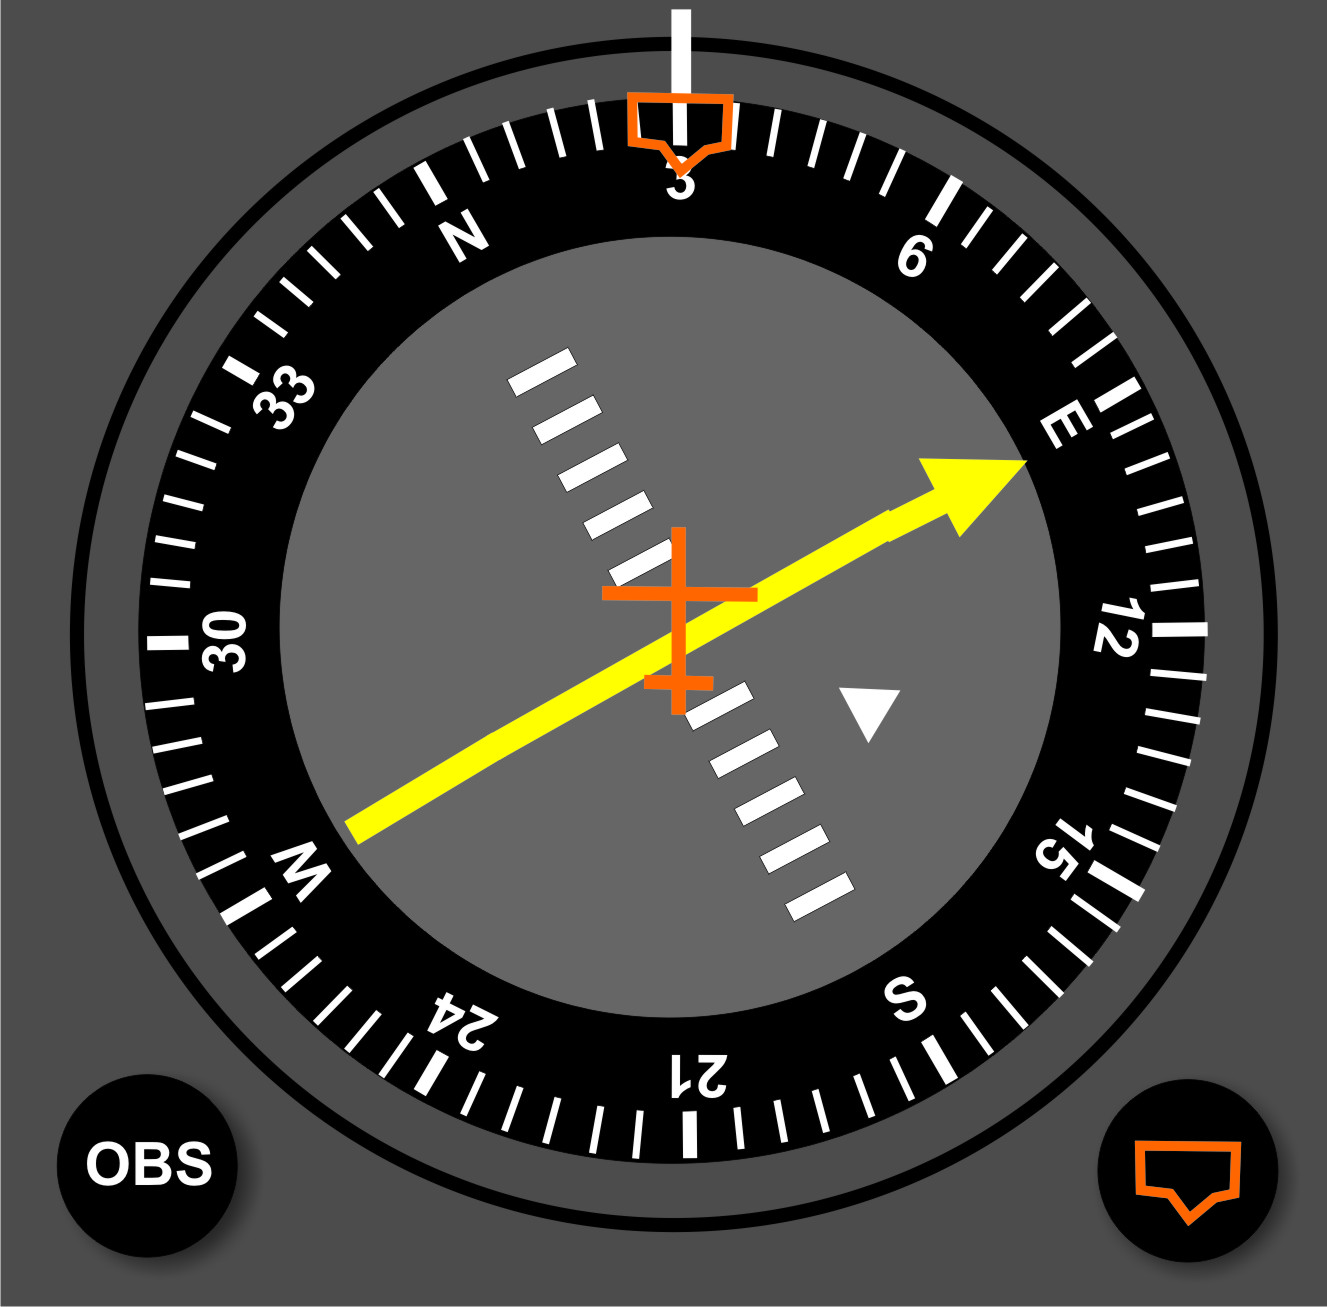
TO – Here we are flying along and want to know where we are in relation to the station. We turn the OBS knob until the CDI needle is centralised – keep turning until a ‘TO’ arrow/flag is showing. 030 is current heading where the aircraft nose is pointing. The radial we are on is 270, and the track to get to the VOR is 090.
STEP 3 – WHERE DO WE WANT TO GO?
If, we would like to fly on a specific radial from our current position we would most probably need to intercept it. For example, we are now entering controlled airspace, under IFR, and we are told by ATC to intercept radial 030 TO the station. REMEMBER! We are now wanting to go TO the station, so we need to put the TAIL of the needle on the actual radial of 030. The pointer will be on 210 which indicates the heading to follow to be on this radial. Our current heading is 240, which is to the right of our desired heading of 210, so the middle part of the yellow CDI needle will separate and move left to show us that we need to fly LEFT in order to intercept the radial. If the middle bar were to move to the right, then the CDI would be telling us to fly RIGHT.
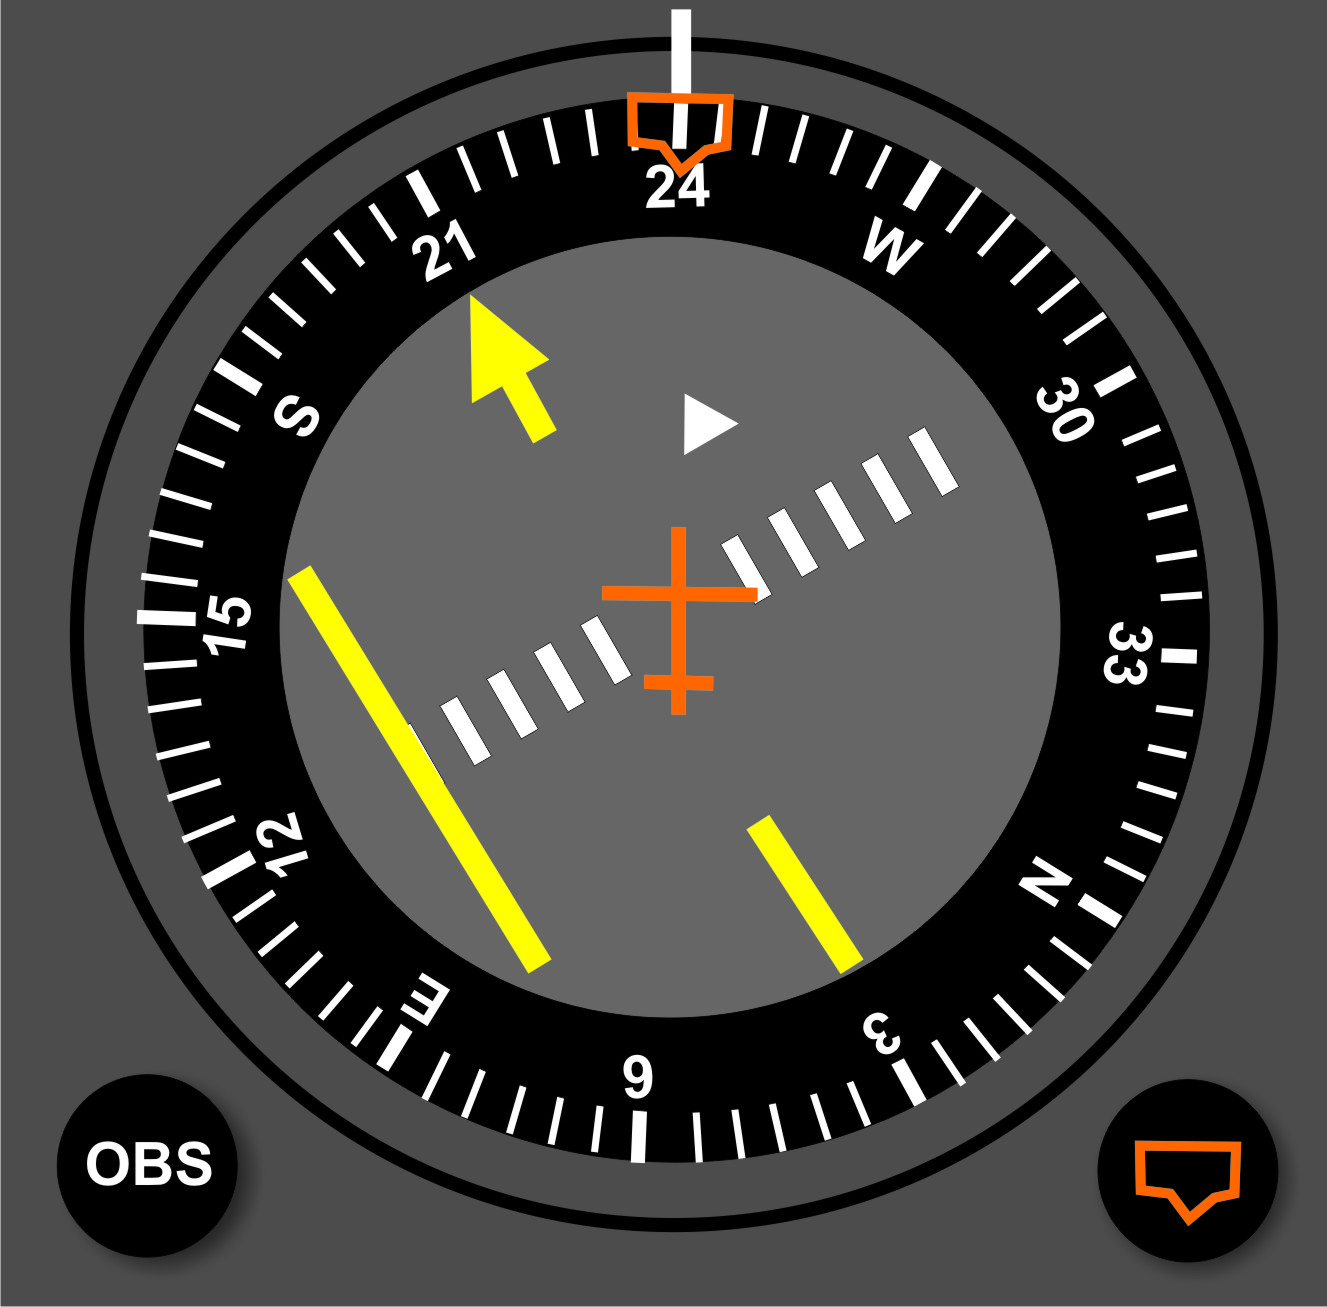
Now, in order to get our needle centralised on the radial 030, we are NOT going to turn the OBS knob (as this would give us a different radial number), we are going to fly to the left to intercept the 030 radial. How do we do this? We fly a nice rate 1 turn until the white lubber line (at the top of our compass rose) touches the tip of the middle yellow bar, then we roll out and fly this heading until the middle bar starts to move to its central position in the yellow CDI needle. When this starts to happen, then we turn a little to the right, but we keep the two tips touching until the CDI needle is completely centralised on radial 030.
How long does it take? This depends on how far away from the VOR we are, the further we are, the slower it will move towards the centre.
What about wind? The beauty of this instrument, is that as long as the CDI needle is centralised, it will keep you on the correct heading to hold that radial – so your heading once centralised might be 215, but all you need to do is follow the CDI. Easy peasy!
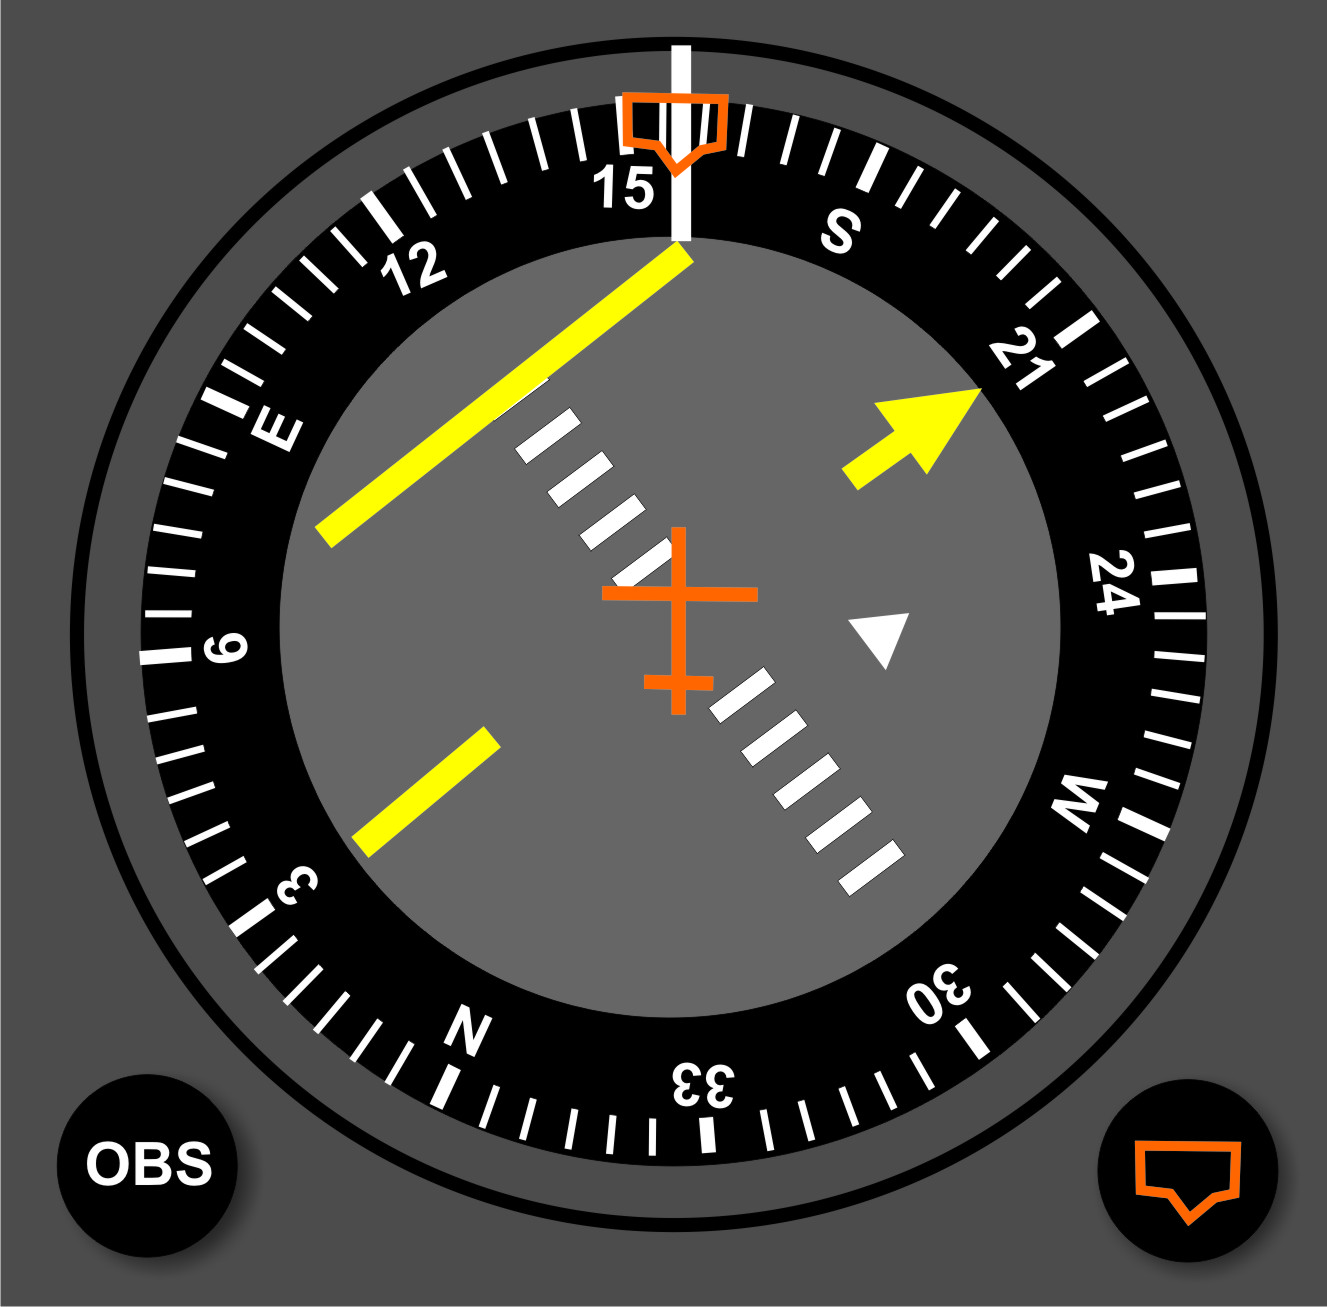
TO RADIAL 030
Turn the tail of the CDI to touch 030. In order to get a TO flag showing, 030 will be at the bottom. The CDI tells us we need to fly left to intercept this radial. Do a rate 1 turn until the white line at the top of the compass rose touches the top of the yellow CDI line. Level out and hold this heading.
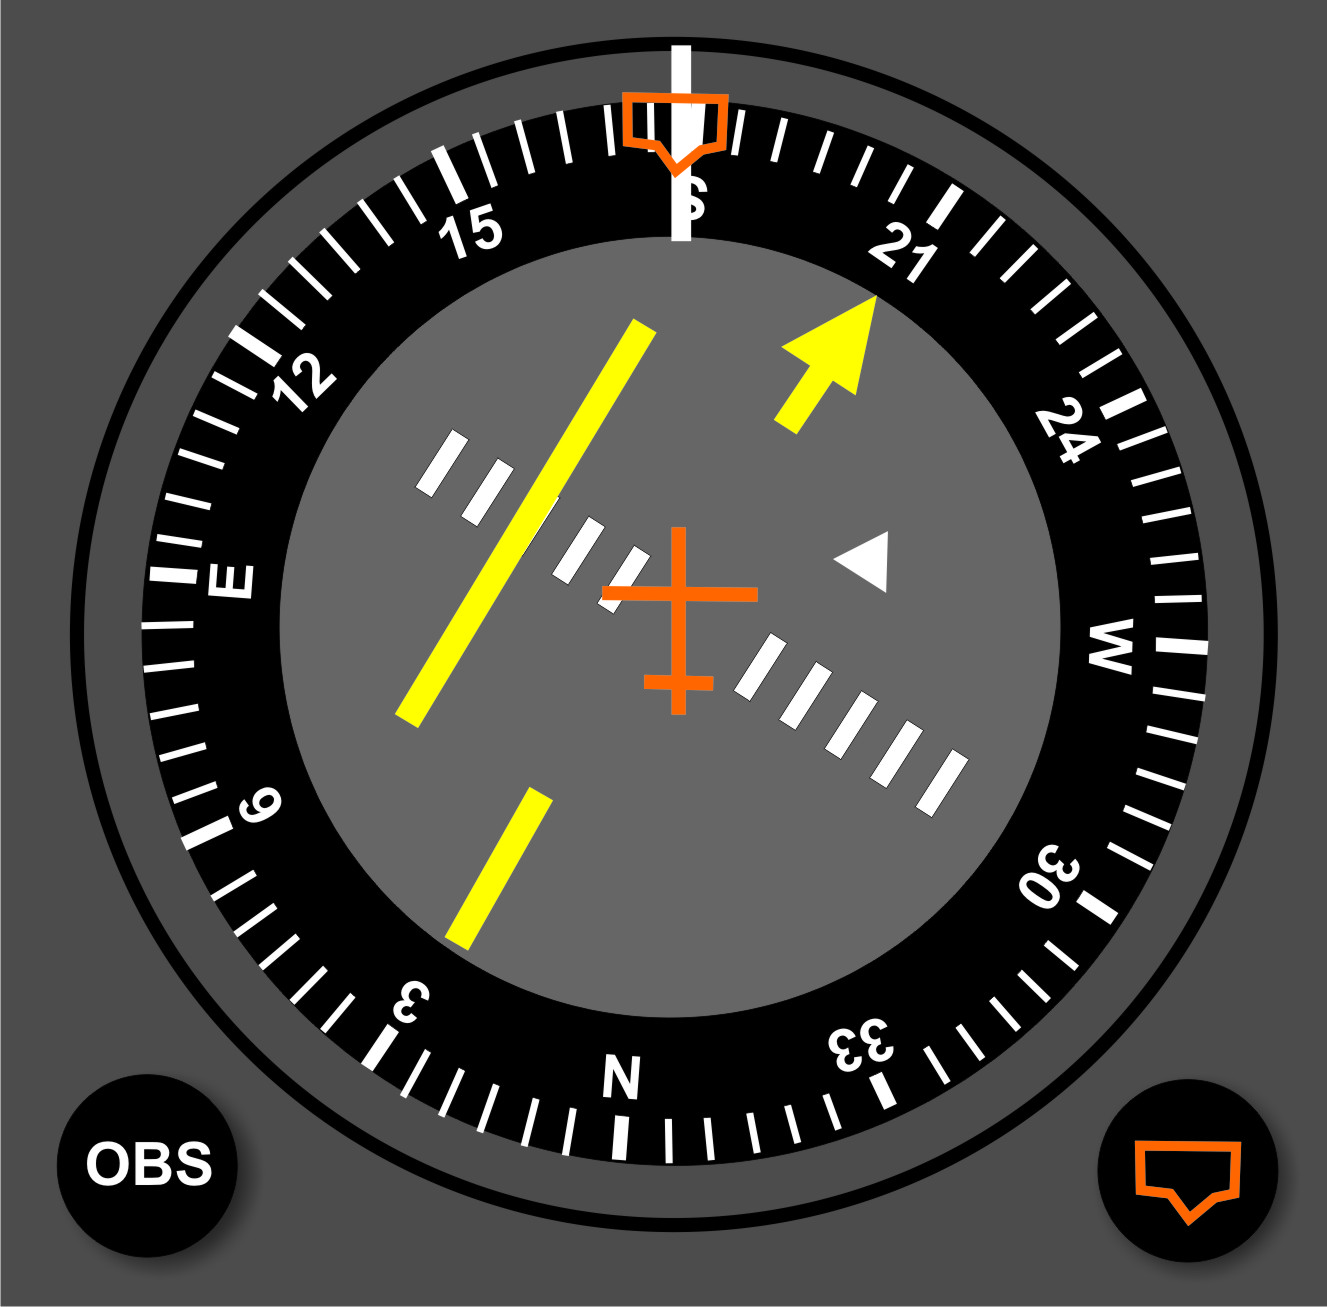
TO RADIAL 030
Hold the position where the white line and yellow line touch, even when the yellow starts to move inwards. Gently follow the yellow line inwards (turning right)
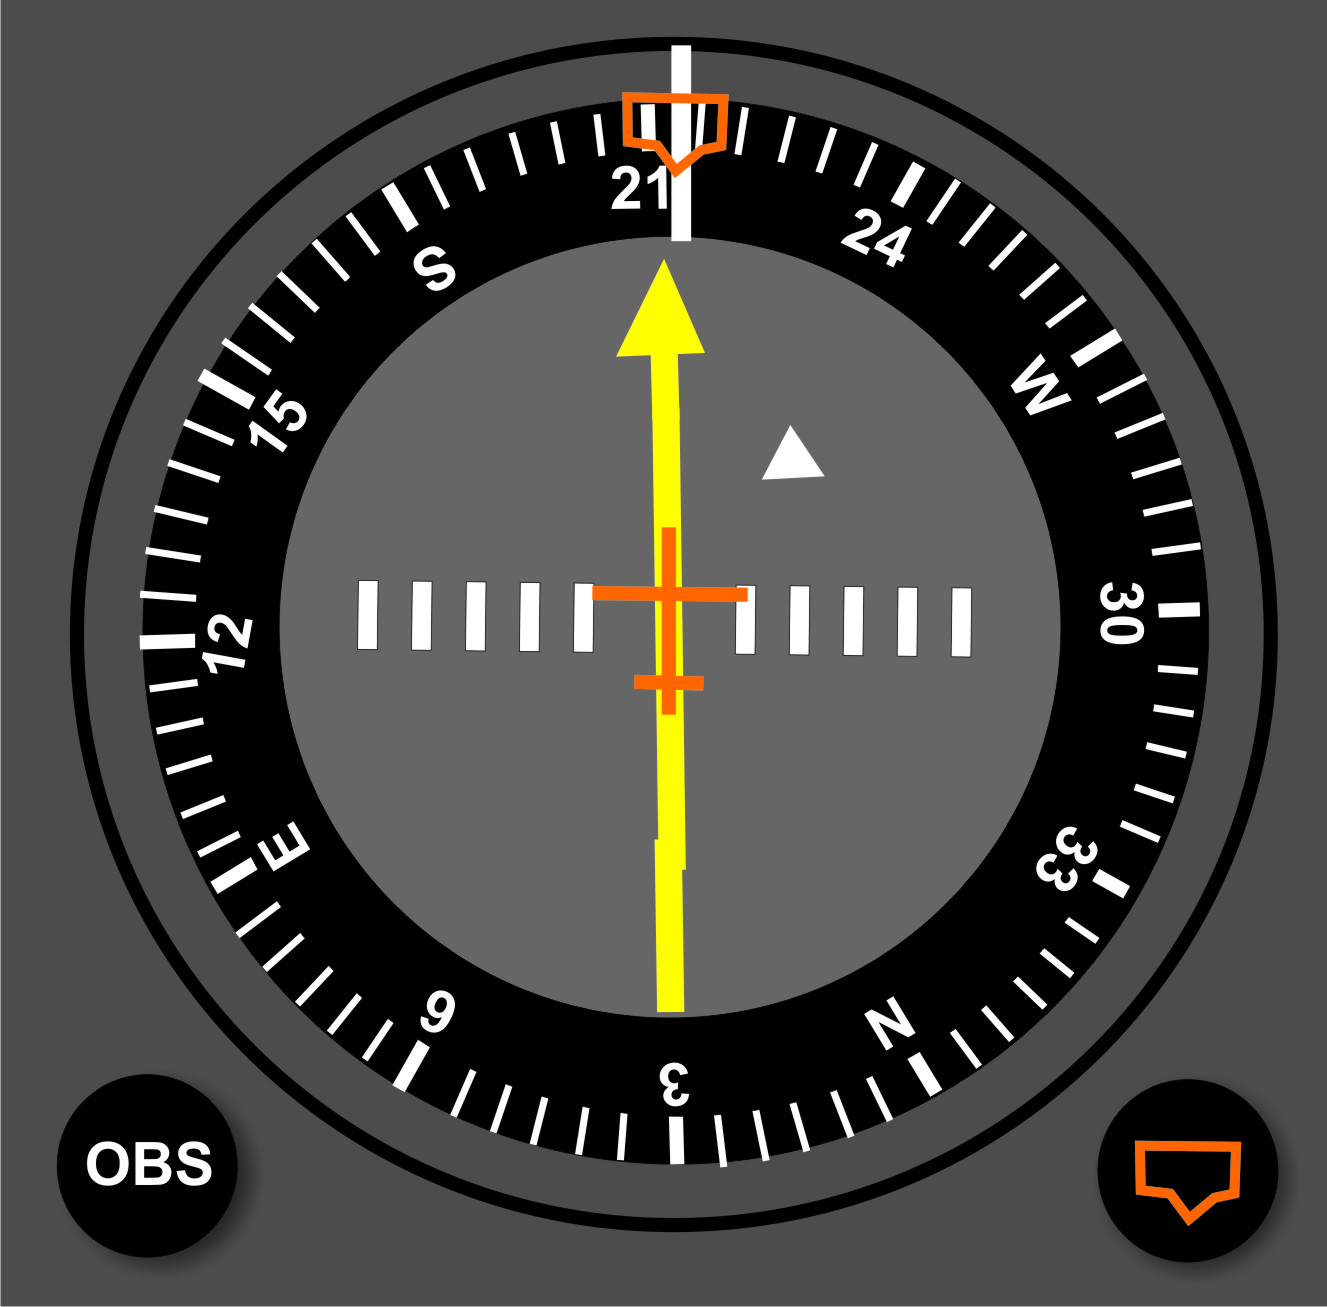
ESTABLISHED ON RADIAL 030 TO THE STATION
Once the needle is centralised, hold this heading, even if it is not 210 – the centralised needle gives us a heading which compensates for drift caused by the wind. In this case we have a slight wind from the right, so we are flying slightly to the right on a heading of 214.
Once we fly directly over the VOR station then the TO arrow/flag will change to a FROM pointing in the opposite direction. We will now be on radial 210 FROM the station.
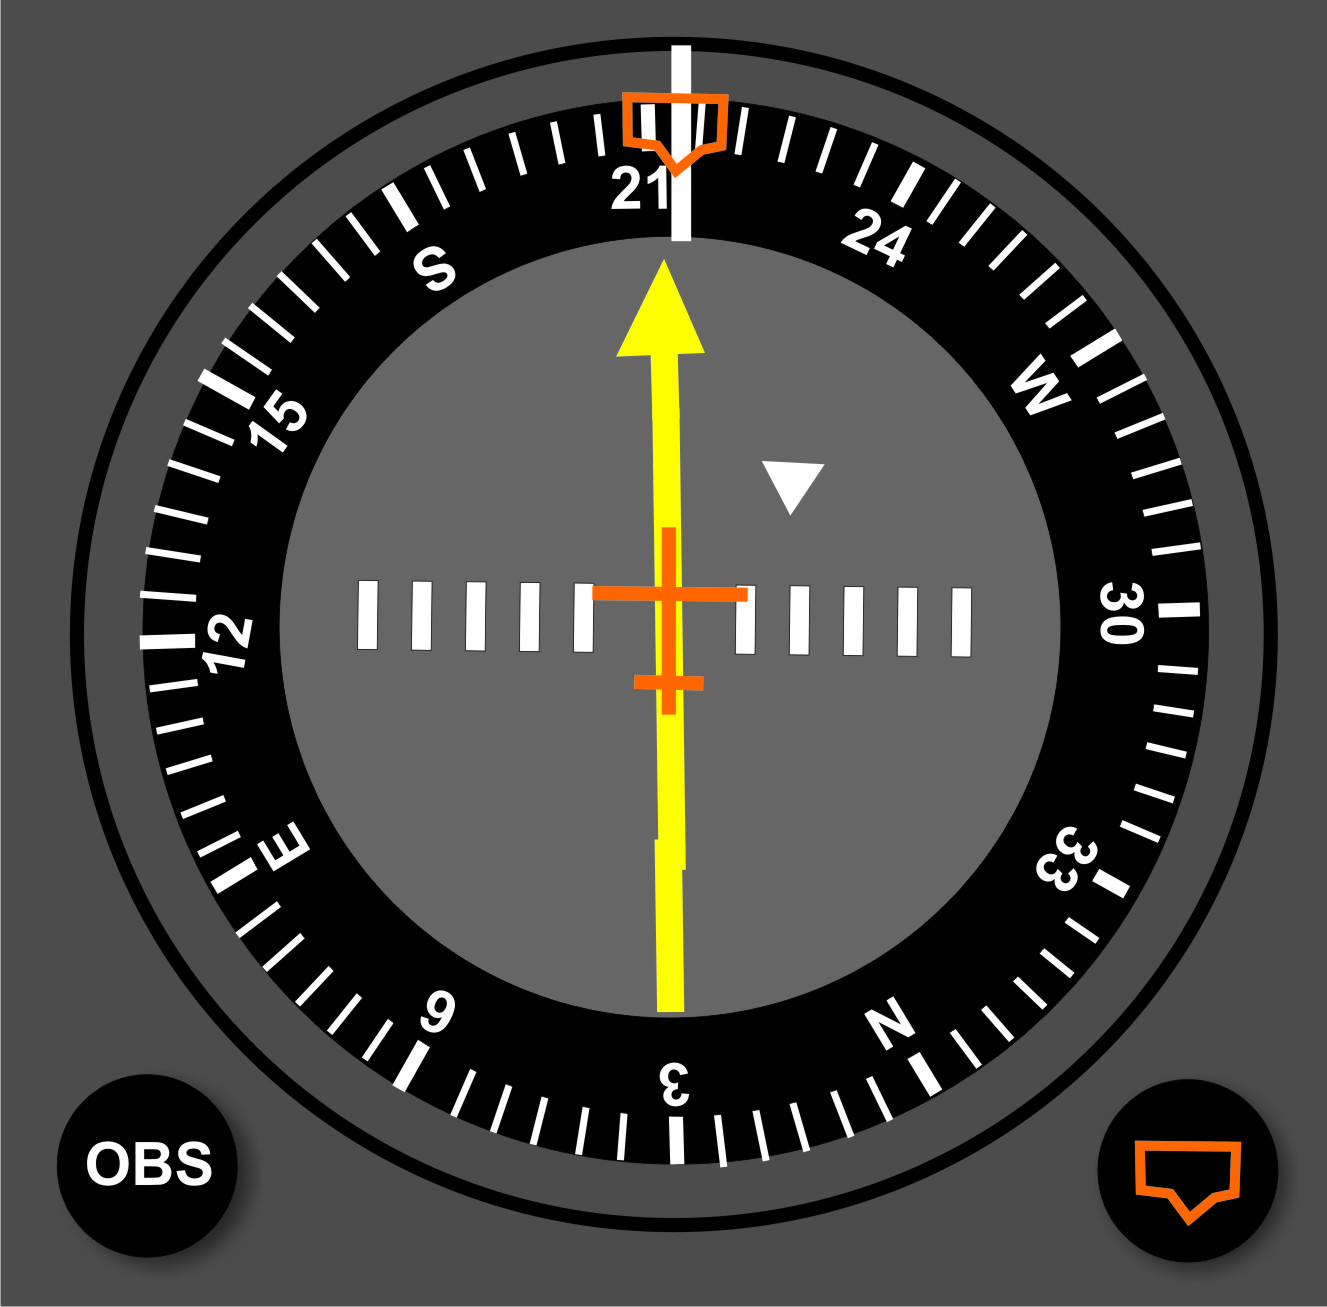
OVERHEAD
As we fly overhead the VOR station the TO arrow flips over and becomes a FROM arrow, indicating that we are now on the 210 radial FROM the station.
The point of this article is for you to understand how the HSI works, and it is a lot fun, but if you want to give it a try, I suggest you give it a go with an instructor, and you’ll learn so much more :).


jfccaf@verizon.net
great article . looking into app for tracker
some difficulty
thanks
john
jfccaf@verizon.net
Thanks Tasnime – we are always looking for new topics, so you are welcome to send in your suggestions!
Thanks a lot! This is such a great explanation straight to the point and put in very simple wording, I enjoyed reading it now and will save it to go back and re read it later, Thank you 🙂